
Ever since I was a child, I’ve been fascinated with mushrooms. Whenever we would visit the mountains I delighted in the various fungus growing among the threes and fertile ground. It was one of my favorite things to take pictures of! I recently stumbled across an article about growing your own mushrooms, so I decided to give it a whirl. Not only did it sounds like a fun project, but mushrooms have many medicinal properties and we enjoy eating them. Homegrown mushrooms are also much healthier than store bought ones, due to the growing mediums used. Store bought mushrooms are grown for high yield and are devoid of several nutrients.
There are several options for growing mushrooms. I decided to try the hardwood log route. Essentially, you place small dowel rods with mushroom spores impregnated into them inside a drilled hardwood log. Seal with wax, and wait.
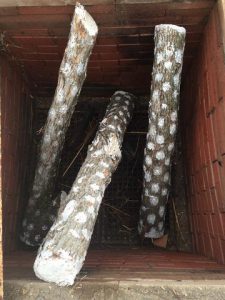
I decided to start small to try things out. Unfortunately, we live in a very arid place. Not exactly conducive to mushrooms. Originally I planned to stash the mushroom inoculated logs on the North side of the Chick Pen, and cover it with a shade cloth. This should work, in theory. But I then remembered we have large, in ground roasting pit that we don’t use. This pit is brick lined with a metal grate on the bottom, and a heavy metal lid. There are often salamanders in it, so I figure mushrooms should find it an enjoyable place to grow.
Table of Contents
Gathering Materials
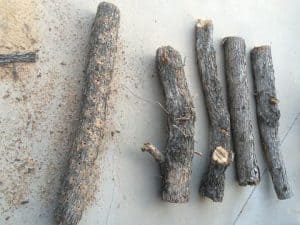
The first step was to obtain the logs. I chose Oak as most of the mushrooms I wanted would readily grow on oak. Logs of 6-8″ round and about 36″ long are recommended. You can use smaller logs, but the larger ones will yield mushrooms for much longer than the smaller ones. The downside is you have to wait longer for them to grow. I figured my patience would be worth it in the long run. Our area has Scrub Oak. Not the mighty oak trees you probably imagined. Nonetheless, scrub oak is an acceptable alternative.
After obtaining the wood (being careful not to damage the bark), it needs to cure for at least 30 days. The wood has natural antifungal properties that need to dissipate before you can inoculate it with the mushroom spawn. If you place them too early, the log will kill the mushrooms. Additionally, it is best to harvest the wood in the colder months, as the tree has added nutrients stored in the wood. I obtained the logs in December, and allowed them to sit about 3 months in the garage (longer than necessary, I forgot about them for a while). If they are stored in contact with the dirt, fungus from the ground can enter the logs. They must be stored away from dirt while they cure- either on a pallet, in the garage, etc.
Order Mushroom Spawn
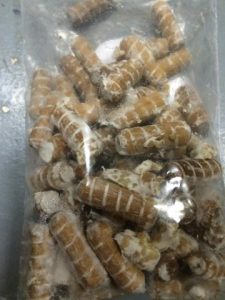
Next, I ordered the mushroom spawn from Fungi Perfecti. Several reviews have rated Fungi Perfecti as reputable, with excellent products and customer service. I ordered three mushrooms plugs, Pearl Oyster, Turkey Tail and Shiitake, as well as 1 pound of sealing wax. After the plugs arrived, I allowed them to sit about a week, as recommended. The plugs became a thick white mass of fuzz, which were the spores growing. Finally, it was time to inoculate the logs!
Putting it all together
First I needed to drill the logs. The instructions called for 5/16″ holes, drilled 1 1/4″ deep. I took my oak logs outside and drilled holes in a diamond pattern, about 3″ apart. After the 3 logs were drilled I took them back to the garage.
I would make two recommendations at this point- as things are about to get messy. It would be best to put down a tarp or something similar for easy clean up. Newspaper will just rip. Also, I would start your crockpot about an hour prior to starting (for the optional wax), and make sure you use a liner.
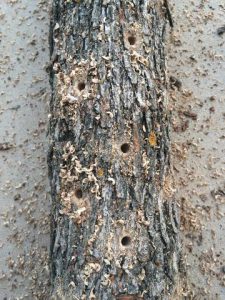
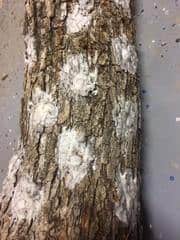
After the logs are drilled, it was time to insert the plugs and seal them. The most difficult part of the project was keeping the wax melted (hence the crockpot suggestion). Each hole drilled must be plugged and sealed to prevent other fungus from entering the log. Only one kind of mushroom can be grown on each log, so don’t mix the plugs. Eventually the strongest strain will overtake the log.
I tamped the plugs into flush holes with a rubber mallet. Be careful not to damage the bark, which is vital for mushroom development. When I had finished placing the plugs, I went back and checked to be sure all holes are filled and sealed. Also, I wax sealed the end of the logs. This helps retain moisture. Then I labeled the log so I didn’t forget which strain it was inoculated with.
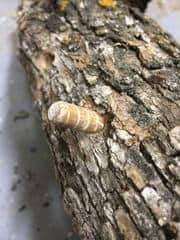
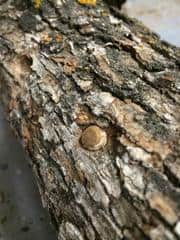
Insert plug into hole and tamp until flush. Then seal with wax. I would recommend using less wax than pictured. I struggled to keep the wax warm enough and it was difficult to apply. Properly heated wax should be thinner and easier to brush on.
Before continuing to another strain, I sanitized the mallet to prevent cross contamination. When all logs are completed, it was time to place them in the desired location.
Storage
When placing the logs, only the same strains should be touching. Otherwise the different strain may spread and overtake neighboring logs. Do not place the logs outside until risk of freezing has passed. If you undertake this project in the winter, logs can be placed outside (in the cold) after 30 days. I recommend waiting until the regular freezing temperatures have passed. I placed these logs in late April (we are Zone 5b). It will take 9-12 months before logs will fruit, if all goes well. During that time logs will need to be subject to natural moisture. When I know it’s going to rain, I just remove the lid and replace it when the storm has passed. You can also soak the logs and force them to fruit, but I am allowing them to set their own pace.
For now, I must wait and daydream of harvesting mushrooms from the backyard. An update will be posted when they start to fruit!
2017 Update
Due to my own laziness, I am sad to say the logs never fruited. I allowed them to dry out and did a really awful job of taking care of them. I sprayed them with water a few times, but in out 100+ degree summers, that was definitely not enough, even though they were below ground. Once I finally had an extra stock tank to soak them in, it was too late. I am sure they would have grown beautifully, as the extra plugs I kept had a TON of mycelium growth in the plastic bag. If you live in a cooler area, especially one with rain, these should do great for you. If you live in the desert like we do, they can be successful, but will require more work than I did.